
Introduction
Hi dear reader! This is one more project I did to practice a few technologies, so you'll see NestJS, NextJS, SQS, Tests, and MongoDB, all exciting technologies! I'm sure you'll enjoy this post and project as much as I did. Let's start!

Overview
I was browsing some websites and found one interesting tech assessment from an anonymous company. I got the main idea from this assessment, and then I decided to put a few technologies that I would like to test or improve my knowledge.
The project
One company wants to have on its website the possibility to order exchange currencies, like conversion orders, the idea is to adapt its existing interfaces to use this service by its customers. They have a large number of active users daily, so this service must be scalable, and the idea is to send the customers an email with the result of the conversion.
As the company has its tech department, this project focuses on the backend side, with the main functionalities of receiving, converting, and sending an email (async). The front end must also be implemented as an example to the developers.
Important 🎯
- Use this API for the conversions: https://apilayer.com/marketplace/currency_data-api;
- Use https://mailtrap.io for examples of sending;
- All orders must be saved inside a non-relational database;
Technologies and strategy 🗺
My main idea is to use a few different technologies to implement the project, like:
- NextJS
- SQS
- NestJS
- MongoDB
- SQS
As the requirements ask for one scalable service and the email sendings can be async, I'll use NestJS as a service that SQS service to receive the orders, process them and send the emails. With this approach, every existing system or website can integrate with its backend to send the SQS messages in a scalable way.
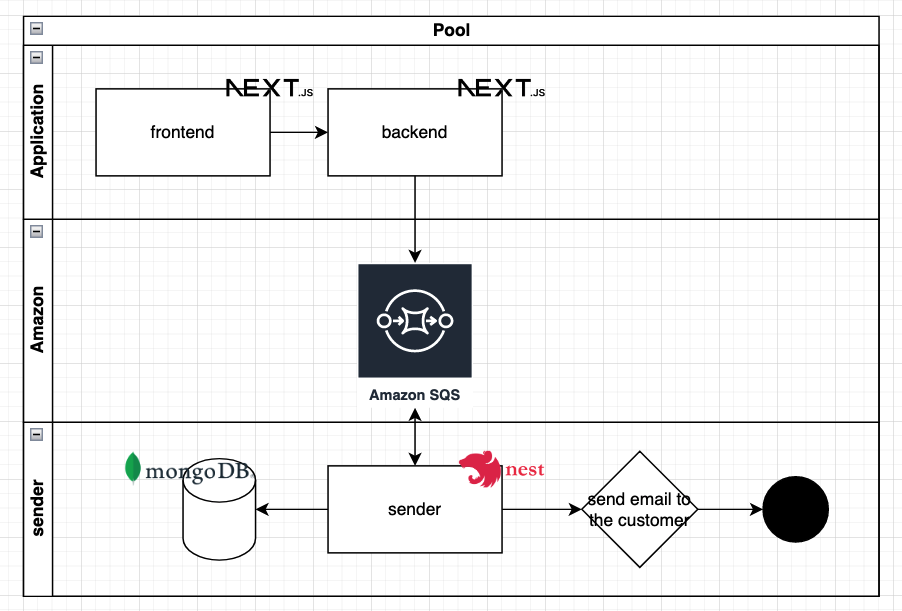
https://drive.google.com/file/d/1QzN1ni7TqvvcPXsx4pkfT_mwMzP5e5FA/view?usp=share_link
Project Repository
nestjs-tests-lab/currency-conversion-async at master · henriqueweiand/nestjs-tests-lab

Technical implementations 🧙♂️
Ok! now it's time for the magic!
I am going to start from the backend side with the folder structure and then the flow of information through the application in order to be clear about everything that the project has.
backend ⚙️
The backend is working with NestJS, it is a well-known framework in NodeJS, with a good community and very scalable.

I normally use this framework in my projects, and I want to use this opportunity to improve my techniques using MongoDB, SQS, LocalStack, and Docker.
First of all, I decided to change a little bit the default folder structure of NestJS in order to have low coupling and have one application with more clear architecture. Then I found this blog post on Medium. 👇🏻
Best Way to Structure Your Directory/Code (NestJS)
@prateekkathal, author of the post, shared one interesting structure that caught my attention. His approach is well-segmented in order to keep every module and class very independent of each other.
So I made something like this:
backend
├── .docker
├── .github
│ └── workflows
├── localstack
├── scripts
└── src
├── config
│ ├── aws
│ ├── database
│ ├── mail
│ └── queue
├── models
│ └── orders
├── providers
│ ├── database
│ ├── mail
│ ├── queue
│ │ ├── consumer
│ │ └── producer
│ └── service
└── services
└── exchange
Data flow
In this section, I'll guide you to each step of the application in order to understand how I'm solving the problem.
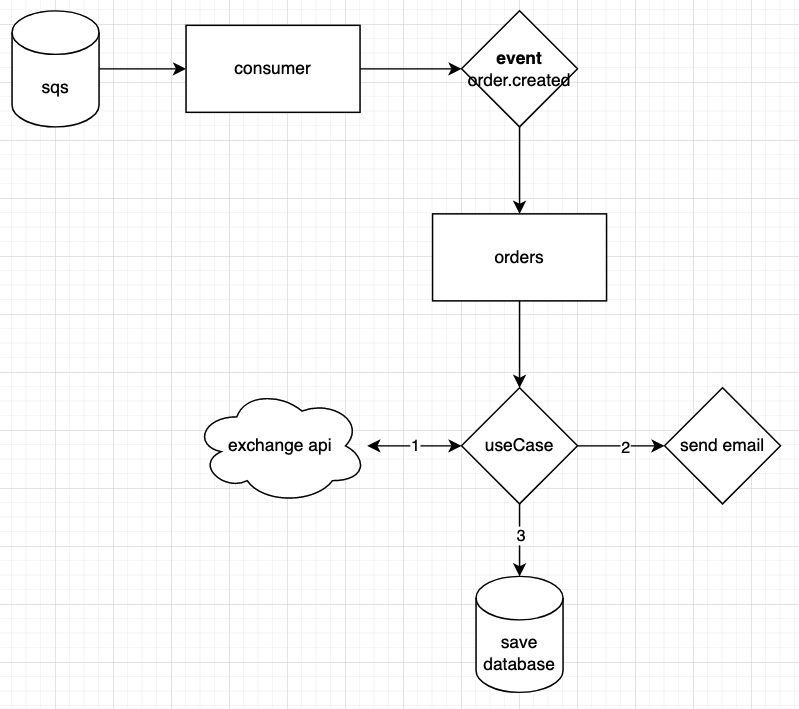
https://drive.google.com/file/d/1QzN1ni7TqvvcPXsx4pkfT_mwMzP5e5FA/view?usp=share_link
On the image besides here, you can have the ideia of the data flow.
Our first step is SQS, in this case i am using Localstack, because my ideia is to have one local enviroment for developing without to have an AWS account for example. It because LocalStack is a service that provides the same interfaces and functionalites as AWS provider, so you can use this service as a “Local AWS”.
In case you want to run the application, follow the steps from the project's readme You'll find everything, plus docker files to run the solution locally.
Receiving the message from SQS
Our initial point is the consumer, it is located inside of this folder /src/providers/consumer. This module is pretty simple, it only implements a ConsumerHandle, as you can see:
@Module({
  imports: [EventEmitterModule.forRoot(), QueueConfigModule],
  controllers: [],
  providers: [ConsumerHandler],
})
export class ConsumerModule implements OnModuleInit {
  constructor(private readonly service: ConsumerHandler) {}

  onModuleInit() {
    this.service.activateReceivers();
  }
}
And in this case, the service “ConsumerHandle” is the principal and responsible to implements the AWS.SQS, function and read the messages from the QUEUE
public async ordersConsumer() {
    const queueUrl = this.queueConfigService.inputOrderUrl;
    const sqs = this.sqsIntance;
    const receiveParams = {
      QueueUrl: queueUrl,
      MaxNumberOfMessages: 10,
      WaitTimeSeconds: 5,
    };

    while (true) {
      const response: ReceiveMessageResult = await sqs
        .receiveMessage(receiveParams)
        .promise();
      const messages = response.Messages ?? [];

      for (const message of messages) {
        const queueMessage = JSON.parse(message.Body);
        const exchangeMessage: IExchangeMessage = queueMessage.body;

        this.eventEmitter.emit(EnumEventOrders.OrderCreated, exchangeMessage);

        await this.deleteMessage(queueUrl, message.ReceiptHandle);
      }
    }
  }
Here, you can see another detail. I am using Events in order to communicate with every model that wants to know that the service received a new message.
Documentation | NestJS - A progressive Node.js framework
I decided to use this technique just because I think is a good way to have less complexity and low coupling because, like I said, the module that needs to know the event can start listening to it. And finally, this is the body of the message
export interface IExchangeMessage {
  email: string;
  currencyFrom: string;
  currencyTo: string;
  amount: number;
  comment: string;
}
Processing the messages
In this project, I only have one module responsible for listening to every new exchange order and processing that.
The module is /src/models/orders; for this one, we have more complexity, because it is responsible to:
- Receive the message;
- Use the exchange API;
- Save response inside the MongoDB;
- Send the email;
@Module({
  imports: [
    MailDatabaseProviderModule,
    ExchangeModule,
    MongooseModule.forFeature([{ name: Orders.name, schema: OrdersSchema }]),
  ],
  controllers: [],
  providers: [
    OrdersRepository,
    OrdersService,
    ProcessMessageUseCase,
    OrderCreatedListener,
  ],
  exports: [OrdersService],
})
export class OrdersModule {}
Ohh I didn't comment anything about the dependencies, but as you can see, there is a folder called
config, and in there, we have modules that centralize the base configurations, and then we have other two ones calledservicesandproviders, which have the functionalities like send an email, or the integration logical with the API.
The next step is with src/models/orders/listeners/order-created.listener.ts, which will receive the Event and call the "core” method I would say it because here we have our main and only use case src/models/orders/useCase/process-message-use-case.ts which is responsible for:
- Call the API of exchange currencies;
- Send the email;
- Save the order inside the database;
Frontend 🎨
The front end is working with NextJS, it is another well-known framework on the frontend community by Vercel.
For someone that is used to ReactJS and don't know about NextJS, I would say that NextJS delivers more tools and is a good way to work with ReactJS in general.
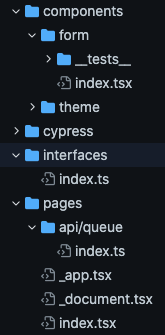
This is a traditional NextJS project; however, I did the folder and components organization as simply as possible. For example, we have the components folder that has the form component, which is the main and only form of the application.
There's not so much to say about this application because it has only one page and one endpoint that turns the user able to fill out the fields and send them to the backend.
Sending messages to the service
inside of pages/api/queue we have our endpoint that is responsible for receiving and putting the message inside of the SQS Queue.
const sqs = new AWS.SQS({
  accessKeyId: process.env.AWS_ACCESS_KEY_ID,
  secretAccessKey: process.env.AWS_SECRET_ACCESS_KEY,
  region: process.env.AWS_REGION
});

export default async function handler(
  _req: IRequestOrder,
  res: NextApiResponse
) {
  const message = {
    MessageBody: JSON.stringify({
      id: 'id',
      body: {
        email: _req.body.email,
        currencyFrom: _req.body.from,
        currencyTo: _req.body.to,
        amount: _req.body.amount,
        comment: _req.body.comment,
      }
    }),
    QueueUrl: process.env.QUEUE_INPUT_ORDERS_URL as string,
  };

  await sqs
        .sendMessage(message)
        .promise();

  return res.status(200).send('ok')
}
Thinking right now maybe I could add zod as a validator of input fields… but it's ok too. 😅
Ok, to explain to you better, this is the form 👉🏻
After the customer fills and sends the backend, take the scene and do the magic 🧙♂️
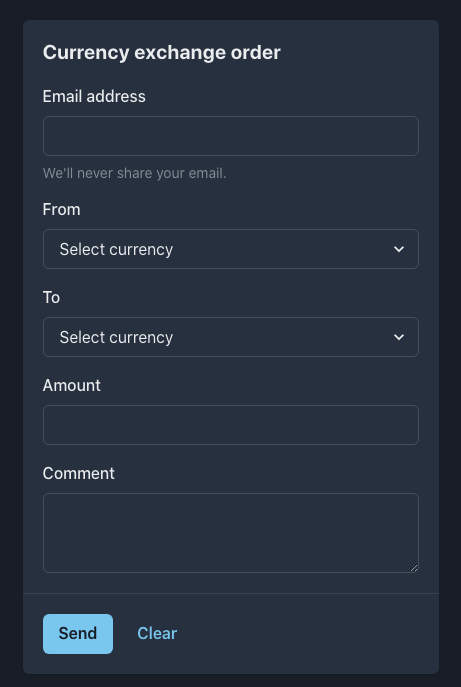
With this example, the company can use the form component to see how they can integrate with the service.
Conclusion
This was one amazing experience to build a complete solution from the front to the backend, I mean, I usually do more simple projects, and even though this project is simple, it was bigger than the others. Plus, applying different patterns, such as folder strategy, low coupling between the modules, event emitter strategy, and tests, was good.
I hope you enjoy this post, and I will see you soon in the next practical tech post.
Possible improvements
Hey, I'm dedicating this section to writing about possible improvements for the future.
- Processing messages
The strategy I applied may not be the best, at least when we talk about the
ConsumerHandler. It is because after the EvventEmitter is called, I remove the message from the QUEUE, and we can have problems with the processing of the order, for example, we can have a problem when calling the exchange currency API.