
Hey there, fellow coders! Let's continue our NestJS auth flow, right? Today we are going to create the two main modules auth and user, they will be very simple just to go straight to the point.
To check the previous post, please, check this out by clicking here 🎯
⚠️ One more important point here to be mentioned, for this post we are not going to use any Database, but, in the future, I am going to integrate this project with Neon.tech
Creating modules: auth & user ⚔️
As we are using the NestJS CLI, we need to open the terminal inside our project folder and run
nest g module auth /
nest g controller auth /
nest g service auth
then run it again, replacing auth to user
nest g module users /
nest g service users
We have a bunch of new files inside the folders "user” and "auth”, which will be useful for interacting with the modules. Now, we need to write some code, so let's start with users.service.ts
import { Injectable } from '@nestjs/common';

export type User = any;

@Injectable()
export class UsersService {
  private readonly users = [
    {
      userId: 1,
      username: 'john',
      password: 'changeme',
    },
    {
      userId: 2,
      username: 'maria',
      password: 'guess',
    },
  ];

  async findOne(username: string): Promise<User | undefined> {
    return this.users.find(user => user.username === username);
  }
}
As I mentioned, we are not using a database yet, so instead we have a simple array of users that will be used as a table of users. Next, let's edit users.modules.ts to expose the new service.
import { Module } from '@nestjs/common';
import { UsersService } from './users.service';

@Module({
  providers: [UsersService],
  exports: [UsersService],
})
export class UsersModule {}
Putting the Userservice inside of the exposes array, we are turning it importable to the other modules if they need it 😉.
Auth 👨🏼🚀
Speaking about the auth module, now is time to make some changes inside it, let's start editing auth.service.ts
import { Injectable, UnauthorizedException } from '@nestjs/common';
import { UsersService } from '../users/users.service';

@Injectable()
export class AuthService {
  constructor(private usersService: UsersService) {}

  async signIn(username: string, pass: string): Promise<any> {
    const user = await this.usersService.findOne(username);
    if (user?.password !== pass) {
      throw new UnauthorizedException();
    }
    const { password, ...result } = user;

    return result;
  }
}
Now, we update our AuthModule to import the UsersModule.
import { Module } from '@nestjs/common';
import { AuthService } from './auth.service';
import { AuthController } from './auth.controller';
import { UsersModule } from '../users/users.module';

@Module({
  imports: [UsersModule],
  providers: [AuthService],
  controllers: [AuthController],
})
export class AuthModule {}
Finally, let’s expose a new endpoint by editing auth.controller.ts , we need to change the file and keep it like this
import { Body, Controller, Post, HttpCode, HttpStatus } from '@nestjs/common';
import { AuthService } from './auth.service';

@Controller('auth')
export class AuthController {
  constructor(private authService: AuthService) {}

  @HttpCode(HttpStatus.OK)
  @Post('login')
  signIn(@Body() signInDto: Record<string, any>) {
    return this.authService.signIn(signInDto.username, signInDto.password);
  }
}
As you can see, we exposed the route called login and it is a POST route that receives two parameters, one is username and the second one is password. The AuthController injects authService as a dependency to be used inside of the method signIn, which is provided by the auth module.
We have all done so far, now, it's time to test!
Using the API
I am going to use Insomnia as a tool to test my endpoints and request the endpoint http://localhost:3000/auth/login with the JSON as you can see below.
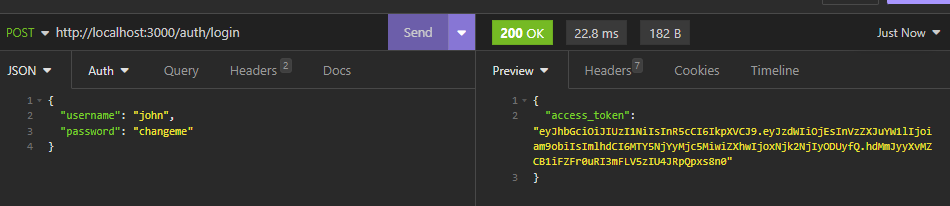
Now we have the token that will be used to validate the credentials for our next endpoints!
Conclusion
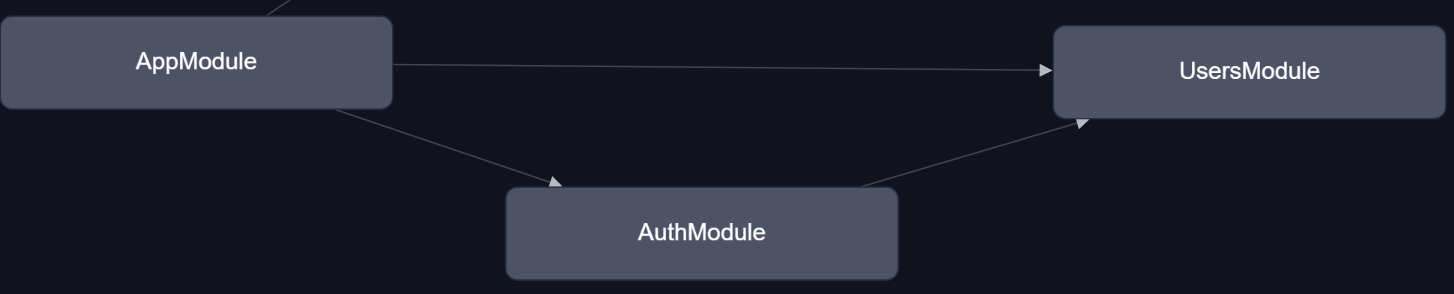
So far, we created two modules that are connected between them, and using dependency injection we can take advantage of the other modules and have the application with as much lower dependency as possible. This content is just a simple example but we are going to check out more advantageous methods to scale an application soon.
Stay tuned to the next post 😎, see you.
https://github.com/henriqueweiand/nestjs-auth-flow-blog-post