
Not so different from any other ordinary type of project, multi-tenancy is a software architecture that has been in place for quite a while, and as with any other approach, there are pros and cons. In this article, I plan to walk you through a simple solution I implemented to tackle basic architecture inside the universe of the NestJS framework with TypeORM.
Context
I've been studying and trying new approaches whenever something pops up and I wonder how to do that technically, or when I found something cool! I've written a few articles with this idea in mind, and this one is no different! I was talking to my brother the other day and he is planning to migrate a project that runs with PHP to node and he asked me if I knew an example of multi-tenancy with NestJS. Despite being in the technology for a while, I worked on something with C++ in the past but not with Node or NestJS. In the end, it wasn't a problem, I took it as my new study subject and tried it!
The final code is available on the link below on GitHub
https://github.com/henriqueweiand/nestjs-typeorm-multi-tenancy
I don’t describe the details in this article, just the overview and how the application works according to the target, which is:
- NestJS project;
- Multiple databases, one for each customer;
- Use TypeORM to deal with the database connection;
Multi-tenancy
Let me start by saying that multi-tenancy has different types, some of them are:
- A single application, single database;
- A single application, multiple database;
- Multiple applications, multiple databases;
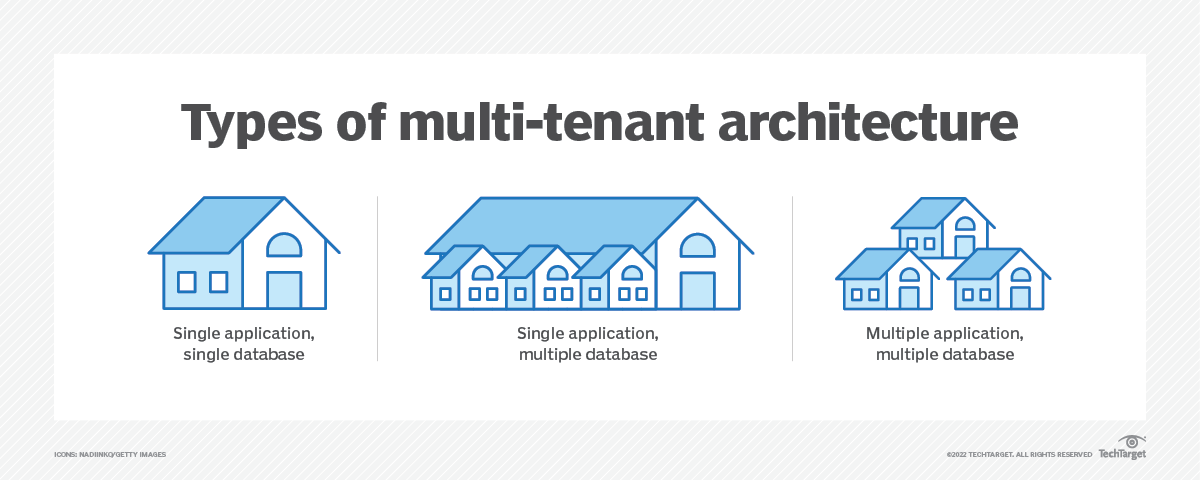
You can find more details about the concept online. (What is multi-tenancy (multi-tenant architecture)).
In case you want to know, this project uses a single application and multiple databases. 🎯
Developing
Before I started, I researched NestJS packages, existing libraries, public projects, and articles and I found a few interesting contents, for example:
https://github.com/mguay22/nestjs-multitenancy
None of them matched exactly what I needed, which motivated me to continue and implement it, and in the end, I got some shared knowledge from all the materials and included them into my project version.
The project has two main folders that are essential for the idea.
- /src/libs/database
- /src/libs/tenancy
Database
Starting with the database, it is important to note that the service implements OnModuleInit, which executes a logic when the app starts and the service is instantiated. What I implemented consists of the following sequence:
- App starts;
- The app initiates a default DB connection;
- This instance gets the data from a default database and table tenant which holds the database information for all the customers;
- This connection verifies if each database from the data is created and if so, it runs the migrations over the customer's database, otherwise, it creates a new database and also runs the migrations over it.
- An exclusive Data source is created for each one of the databases and stored in memory;
- Close the default connection (this connection is different from the other databases);
All this logic is happening inside the database.service.ts in case you want to check it out.
import { Inject, Injectable, Logger, OnModuleDestroy, OnModuleInit } from '@nestjs/common';
import { ConfigType } from '@nestjs/config';
import { DataSource, DataSourceOptions, Repository } from 'typeorm';
import { ClsService } from 'nestjs-cls';

import { Tenant } from 'src/libs/tenancy/entities/tanant.entity';
import { TENANT_KEY } from 'src/libs/tenancy/tenancy.constants';
import { DataSourceConfig } from './datasource.config';

@Injectable()
export class DatabaseService implements OnModuleDestroy, OnModuleInit {
  private readonly logger = new Logger(DatabaseService.name);
  private tenantConnections = new Map<string, DataSource>();
  private defaultDataSource: DataSource;

  constructor(
    @Inject(DataSourceConfig.KEY)
    private readonly dataSourceConfig: ConfigType<typeof DataSourceConfig>,
    private readonly cls: ClsService,
  ) {
  }

  private async initializeDefaultConnection() {
    const defaultDataSourceOptions: DataSourceOptions = {
      type: this.dataSourceConfig.type,
      host: this.dataSourceConfig.host,
      username: this.dataSourceConfig.username,
      password: this.dataSourceConfig.password,
      database: this.dataSourceConfig.database,
      port: this.dataSourceConfig.port,
      logging: this.dataSourceConfig.logging,
      entities: [__dirname + '/../tenancy/**/*.entity{.ts,.js}'],
      migrations: [`${__dirname}/system-migrations/*{.ts,.js}`],
      migrationsRun: true,
      synchronize: false,
    };

    this.defaultDataSource = new DataSource(defaultDataSourceOptions);
    await this.defaultDataSource.initialize();
    this.logger.log('Default connection initialized');
  }

  async onModuleInit() {
    await this.initializeDefaultConnection();
    await this._createTenantConnections();
  }

  async onModuleDestroy() {
    for (const [tenantId, dataSource] of this.tenantConnections) {
      await dataSource.destroy();
      this.logger.log(`Closed connection for tenant ${tenantId}`);
    }
  }

  private _createConnectionString(tenant: Tenant): string {
    return `${tenant.connectionType}://${tenant.username}:${tenant.password}@${tenant.host}:${tenant.port}/${tenant.database}`;
  }

  private async _createTenantConnections() {
    const tenantRepository: Repository<Tenant> = this.defaultDataSource.getRepository(Tenant);
    const tenants = await tenantRepository.find();

    for (const tenant of tenants) {
      const connectionsString = this._createConnectionString(tenant);
      await this._createTenantConnection(tenant, connectionsString);
    }

    await this.defaultDataSource.destroy();
    this.logger.log('Default connection closed');
  }

  private async _createTenantConnection(
    tenant: Tenant,
    connectionString: string,
  ) {
    await this._createDatabaseIfNotExists(tenant.database);

    const dataSourceOptions: DataSourceOptions = {
      type: tenant.connectionType as any,
      url: connectionString,
      synchronize: false,
      migrationsRun: true,
      entities: [__dirname + '/../../components/**/*.entity{.ts,.js}'],
      migrations: [__dirname + '/migrations/*{.ts,.js}'],
    };

    const dataSource = new DataSource(dataSourceOptions);
    await dataSource.initialize();

    this.tenantConnections.set(tenant.id, dataSource);
    this.logger.log(`Initialized connection ${tenant.database}`);
  }

  private async _createDatabaseIfNotExists(database: string) {
    const result = await this.defaultDataSource.query(`SELECT 1 FROM pg_database WHERE datname = '${database}'`);

    if (!result.length) {
      this.logger.log(`Creating database ${database}`);
      await this.defaultDataSource.query(`CREATE DATABASE ${database}`);
    }
  }

  /**
   * Get the data source for the current tenant
   */
  getDataSource() {
    const tenantId = this.cls.get(TENANT_KEY);

    return this.tenantConnections.get(tenantId);
  }
}
Tenancy
Despite being a simple module if you take a look, it's a crucial part of the project and it put everything together!
This module uses the library nestjs-cls, which is "A continuation-local storage module compatible with NestJS' dependency injection based on AsyncLocalStorage". You also can use the node implementation with async_hooks if you want. The module gets the tenant-id from the request and adds it to the local storage which makes the info available through the request lifecycle.
Continuation-local storage allows to store state and propagate it throughout callbacks and promise chains. It allows storing data throughout the lifetime of a web request or any other asynchronous duration. It is similar to thread-local storage in other languages.
import { Module } from '@nestjs/common';
import { Request } from 'express';
import { ClsModule } from 'nestjs-cls';

import { TENANT_KEY } from './tenancy.constants';

@Module({
  imports: [
    ClsModule.forRoot({
      global: false,
      middleware: {
        mount: true,
        setup: (cls, req: Request) => {
          const tenantId = req.headers['tenant-id'];

          cls.set(TENANT_KEY, tenantId);
        },
      },
    }),
  ],
  exports: [ClsModule],
})
export class TenancyModule { }
Finally, with all that in place, one method inside the database.service.ts, will help us to connect the repositories later to the right database.
/**
 * Get the data source for the current tenant
 */
getDataSource() {
  const tenantId = this.cls.get(TENANT_KEY);

  return this.tenantConnections.get(tenantId);
}
it will get the tenant-id from the local storage as explained before and also the connection from the variable in memory
Connecting a repository to the database
Different from the normal way of using TypeORM, I mean, by using the forFeature method, etc, in this case, you need to do something a bit different.
With the DatabaseModule module added to your Module, you can import the Database service and call
this.userRepository = this.databaseService.getDataSource().getRepository(User);
This line will return an instance of the correct database according to the tenant-id from the header and the User repository to use as needed.
And that's all my friends! We did it!!!
Bonus: Generating migrations
This project is set up in a way that you can use the TypeORM generate command! After making any change in the entities, you can run yarn typeorm:generate, and it will generate the migrations for you. You won't need to run with another command, because the application will run for you once it starts because of the migrationsRun: true
In the readme file, you can find a section about how to run the application
Source: https://github.com/henriqueweiand/nestjs-typeorm-multi-tenancy/blob/main/README.md
# NestJS-Typeorm-Multi-Tenancy

Multi Tenancy base example using TypeORM and NestJS. Article about the project: https://medium.com/@henrique.weiand/nestjs-typeorm-and-multi-tenancy-a7f6176e8319

### How to run

1. Rename .env.example to .env
2. Execute the docker `docker-compose up -d`;
3. Run once the app `yarn start:dev`
4. Stop the app, and go to the tenant table inside the nestjs-typeorm-multi-tenancy database.
5. Insert the connection data as needed (it will create new database)
6. Use the id to make requests. Inform tenant-id in the headers

### Commands

If you want to generate migrations based on the entities, you can do it by running `yarn typeorm:generate`, then, when you start the application, it will run the migrations for all bases.
Conclusion
In this article, we explored a practical implementation of multi-tenancy using NestJS and TypeORM. The solution demonstrates how to handle multiple databases for different customers while maintaining a clean and organized codebase.
The key achievements of this implementation include:
- Successfully setting up a NestJS project with multiple database support
- Creating a system that manages database connections for each customer
- Implementing database migrations and proper connection handling
While this implementation provides a solid foundation, there are opportunities for improvement, such as:
- Adding real-time database verification without requiring app restart
- Implementing a caching layer for better connection management across scaled applications
Overall, this approach offers a practical solution for implementing multi-tenancy in NestJS applications while maintaining flexibility and scalability.